
Colour changing lights never fail to mesmerise! It’s fascinating how colourful lights can instantly change our mood. What if you can DIY a colour-changing Bluetooth WS2812B RGB ring light as your own desk decor light? Look no further, you can now achieve this with the help of the WS2812B RGB Ring, HC-05 Bluetooth Module powered by the MB102 Power Supply Module, interfaced to the ESP8266. Take a look at what each has to offer:-
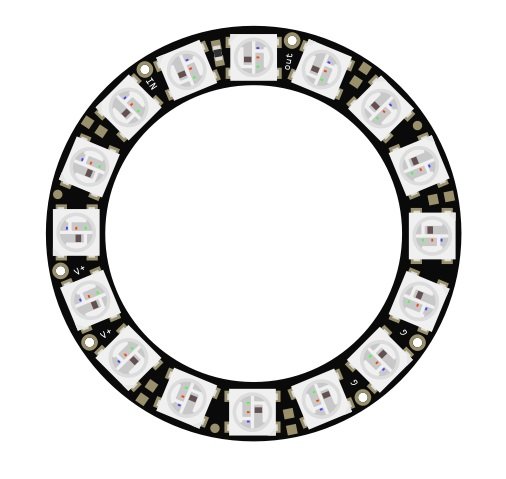
- WS2812B RGB Ring, also known as NeoPixel RGB ring, is a programmable RGB LED light in the form of a ring, where a single pixel is made up of a combination of red, green and blue LEDs and a WS2812 driver chip. Each pixel in the ring can be individually customised without disturbing the others to create a full spectrum of colours and animations. Programming the WS812B RGB ring using any microcontroller is quite convenient, as it supports a single data line communication to control all the pixels at once via a PWM signal.
- HC-05 Bluetooth Module is designed to wirelessly exchange information between a microcontroller and smartphone via Arduino Blue Control Application up to a range of 100m. It has a built-in red blinking LED to indicate its connection status.
- The MB102 Power Supply Module powers various electronic components that draw 3.3V or 5V. For example, the WS2812B RGB ring operates at 3.3V, and the HC-05 Bluetooth Module operates at 5V. The MB102 Power Supply Module can simultaneously power these electronic components at their respective operating voltages via its 3.3V or 5V voltage regulators. It has a built-in green LED indicator and a button to switch On/Off. To power this module, it can be connected to a Power Bank via a Male to Male USB cable.
- ESP8266 is used as a microcontroller to program the WS2812B RGB Ring as per the smartphone’s input, which is conveyed to the microcontroller (ESP8266) via HC-05 Bluetooth module via USART communication.
Explore ESP8266 Related DIY E-Projects: Displaying images on ST7789 IPS module interfaced with ESP8266
The basic working principle is that each button on the Arduino Blue Control App corresponds to an ASCII character to be sent to the ESP8266 by the HC-05 Bluetooth module via USART communication at a 9600 bits/s Baud Rate on button press. ESP8266 inputs the programming instructions to the WS2812B RGB ring via its digital PWM signal. These programming instructions include functions from the Adafruit NeoPixel library that send/receive 24-bit RGB888 format data and speed of transition in milliseconds for every pixel in order to create different colour change/animation effects.
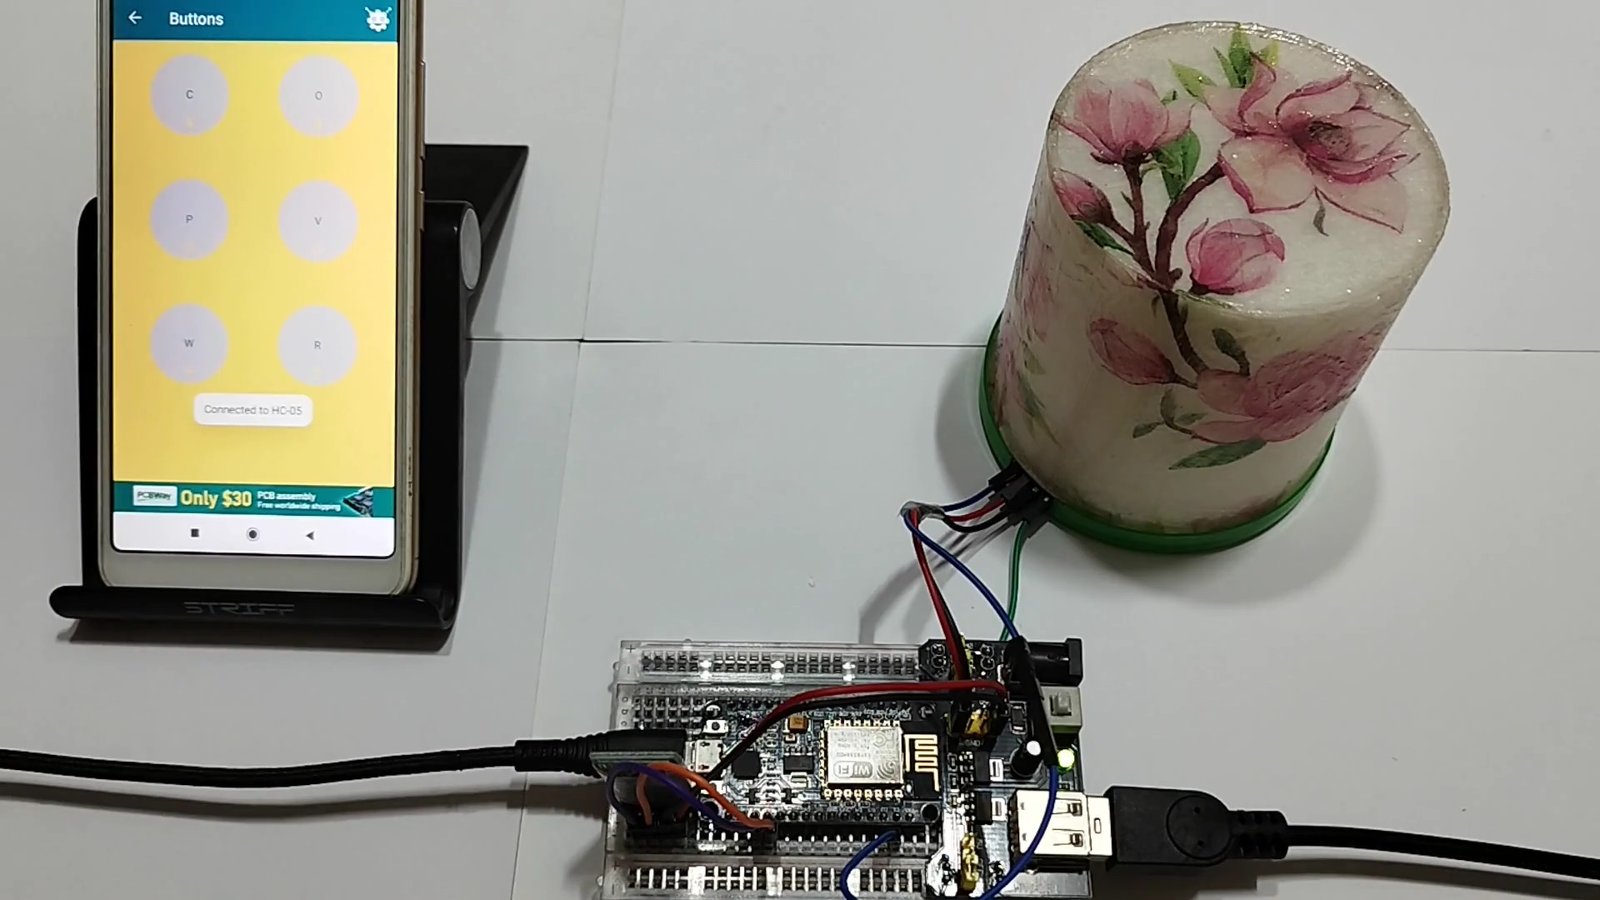
Our aim for this DIY E-project is to change/play the colours/animations of the WS2812B RGB ring light from the Arduino Blue Control smartphone App with 6 different button options:-
Buttons | Displayed Output |
Button C | Cyan light |
Button O | Orange light |
Button P | Pink light |
Button V | Violet light |
Button W | 3 cycles of white chasing light animation |
Button R | 3 cycles rainbow effect animation |
E-COMPONENTS
These are all the electronic components which are required for this DIY E-Project and their purchase links:-
MODEL | E-COMPONENT | PURCHASE LINK |
 | 16 Bit WS2812B RGB LED Ring | |
 | HC-05 Bluetooth Module | |
 | 3.3V/5V MB102 Breadboard Power Supply Module | |
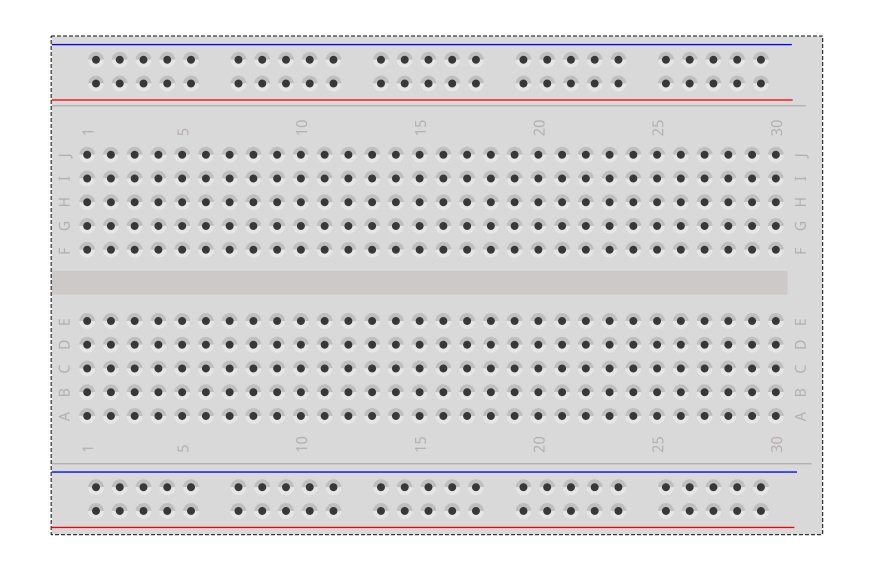 | 400 Points Breadboard | |
 | Male to Male USB cable | |
 | USB data cable | |
 | Power bank |
For creating the lightshade, here are the products required along with their purchase links:-
PRODUCT | PURCHASE LINK |
Tulip Earbud Container | |
Stencil Sheet | |
Decoupage Napkin | |
Mod Podge Gloss |
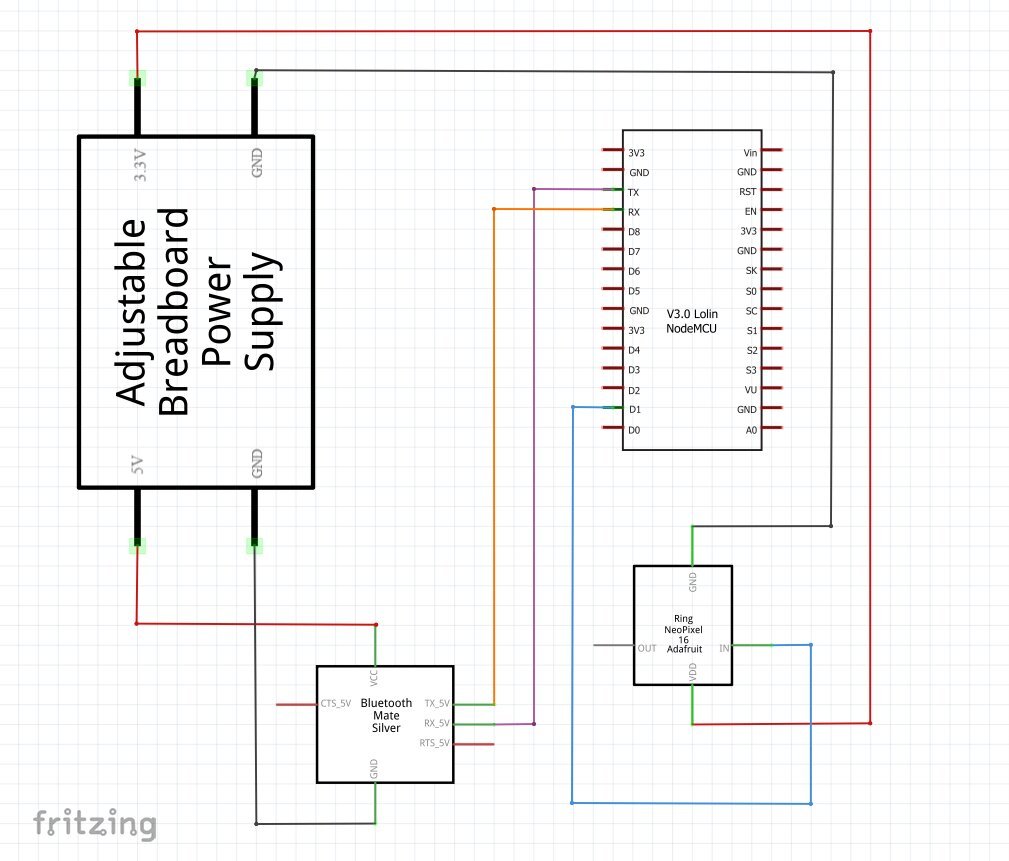
CIRCUIT DIAGRAM

SCHEMATIC DIAGRAM
PROCEDURE
These are some of the step-by-step guidelines to be followed for this DIY E-Project:
- Install the latest Arduino IDE.
- Install the Adafruit NeoPixel library in the Arduino IDE.
- Make hardware connections as per the above circuit and schematic diagrams. (Note: The WS2812B RGB ring needs to be soldered to leads/jumper wires before use. Simply, get it soldered from your local electronic repair shop in case you have no prior soldering experience.)
- Switch ON the 3.3V/5V MB102 Power Supply module by connecting it to the Power bank via a Male to Male USB cable. Connect the ESP8266 to your Laptop/PC via a USB data cable. In Arduino IDE, go to→Tools and select Board as NodeMCU 1.0 (ESP-12E Module) and COM port accordingly.
- Disconnect the RX and TX pins of the HC-05 Bluetooth module to avoid any errors encountered before uploading the “Colour changing Bluetooth controlled WS2812B RGB ring light sketch” from the programming section below to NodeMCU. Reconnect the RX and TX pins of the HC-05 Bluetooth module to the NodeMCU ESP8266.
- In your Android smartphone, go to →Settings→Turn on bluetooth→Scan for available devices→Find HC-05 and Pair using the default passkey 0000 or 1234. HC-05 gets saved as a paired device.
- Download and install the Arduino Blue Control App from the Google Play Store. If prompted, grant the Arduino Blue Control App permission to use Bluetooth. Keeping the Bluetooth ON, launch the Arduino Blue Control App→Click on the settings gear icon→Command buttons configuration→Type the data to be sent to Arduino for a particular button press. To get assured results as per this DIY E-project, follow all the instructions in the video below.

- After completing the program upload, you can plug off the USB data cable connected from the ESP8266 to the Laptop/PC and reconnect it from the ESP8266 to the Power bank.
- Control the Bluetooth WS2812B RGB ring light from your Smartphone via different buttons and witness the colour transitions/animations.
Follow these steps to make the lightshade:-
- Measure, cut the stencil sheet, and cover the inside of the cylindrical container where the WS2812B RGB ring will be placed.
- Insert the stencil layer inside the cylindrical container. Add as many stencil layers as possible to get the desired diffused light effect.
- Make an insertion in the lid of the container for the WS2812B RGB ring wires.
- Decoupage the outside of the cylindrical container as per the desired pattern of the lightshade. Seal the decoupage by applying at least two coats of Mod Podge Gloss.
PROGRAMMING
Sketch 1: Colour changing Bluetooth controlled WS2812B RGB ring light
/*
 * Colour changing Bluetooth controlled WS2812B RGB ring light
 * Made by www.wiztaqnia.com
 * Modified date: 14/09/2023
 * Typical pin layout used:
 * --------------------------------------------------------------
 * Signal              MB102        16-Bit     HC-05     ESP8266
 *                  Power Supply   WS2812B    Bluetooth  NodeMCU
 *                    Module       RGB Ring    Module
 * ---------------------------------------------------------------
 * 3.3V                3.3V          V+         --         3V3
 * 5V                   5V           --         VCC        VIN
 * GND(Ground)          GND          GND        GND        GND
 * DI(Data Input)       --           DI         --         D1
 * RX(Receiver)         --           --         RX         TX
 * TX(transmitter)      --           --         TX         RX
 */
#include <Adafruit_NeoPixel.h>
char key = 0;                 //Initialise a char type variable 'key' to zero
#define pixelcount 16         //Define 'pixelcount' with the Number of pixels in the WS2812B
#define PWM_pin D1            //Define 'PWM_pin' of ESP8266 to which the Data Input of WS2812B is connected
Adafruit_NeoPixel ring = Adafruit_NeoPixel(pixelcount,PWM_pin,NEO_GRB + NEO_KHZ800); //Adafruit_NeoPixel(pixel_count,PWM_pin,pixels are wired for GRB bitstream,800 KHz bitstream)

void setup()
{
  Serial.begin(9600);       //Initialise USART communication with 9600 bits/s Baud Rate
  ring.begin();
  ring.setBrightness(255); //Set the brightness of the pixels. The range of brightness for each WS2812B pixel is 0 to 255.
  ring.show();             //Initialise all pixels to 'off'
}

void loop() {
  for(int i=0; i<pixelcount; i++)
    if(Serial.available() >0) //Check if ESP8266 has received any data from HC-05 Bluetooth Module.
    {
    key=Serial.read();       //Read the incoming data and store it in the 'key'variable

    if(key == 'C')           //Check if Button 'C' is pressed then display Cyan light
     colorWipe(ring.Color(0,255,255),0); //colorWipe(ring.Color(R,G,B),delay in milliseconds)
    if(key =='O')            //Check if Button 'O' is pressed then display Orange light
    colorWipe(ring.Color(255,165,0),0);

    if(key =='P')            //Check if Button 'P' is pressed then display Pink light
    colorWipe(ring.Color(255,0,255),0);

    if(key == 'V')           //Check if Button 'V' is pressed then display Violet Light
    colorWipe(ring.Color(143, 0, 255), 0);

    if(key == 'W'){         //Check if Button 'W' is pressed then play 3 cycles of white chasing light animation
     for(int i=0;i<3;i++)
      theaterChase(ring.Color(100,100,100),50);//theaterChase(ring.Color(R,G,B),delay in milliseconds)
    }
    if(key == 'R')         //Check if Button 'R' is pressed then play 3 cycles of rainbow effect animation
    rainbowCycle(15);  //rainbow(delay in milliseconds)
    }
}

// Fill the dots one after the other with a colour
void colorWipe(uint32_t c, uint8_t wait) {
  for(uint16_t i=0; i<ring.numPixels(); i++) {
    ring.setPixelColor(i, c);
    ring.show();
    delay(wait);
  }
}

//Theatre-style crawling lights.
void theaterChase(uint32_t c, uint8_t wait) {
  for (int j=0; j<10; j++) {  //do 10 cycles of chasing
    for (int q=0; q < 3; q++) {
      for (int i=0; i < ring.numPixels(); i=i+3) {
        ring.setPixelColor(i+q, c);    //turn every third pixel on
      }
      ring.show();

      delay(wait);

      for (int i=0; i < ring.numPixels(); i=i+3) {
        ring.setPixelColor(i+q, 0);     //turn every third pixel off
      }
    }
  }
}

//Theatre-style crawling lights with rainbow effect
void rainbowCycle(uint8_t wait) {
  uint16_t i, j;

  for(j=0; j<256*3; j++) { // 3 cycles of all colours on wheel
    for(i=0; i< ring.numPixels(); i++) {
      ring.setPixelColor(i, Wheel(((i * 256 / ring.numPixels()) + j) & 255));
    }
    ring.show();
    delay(wait);
  }
}

// Input a value 0 to 255 to get a colour value.
// The colours transition r - g - b - back to r.
uint32_t Wheel(byte WheelPos) {
  WheelPos = 255 - WheelPos;
  if(WheelPos < 85) {
    return ring.Color(255 - WheelPos * 3, 0, WheelPos * 3);
  }
  if(WheelPos < 170) {
    WheelPos -= 85;
    return ring.Color(0, WheelPos * 3, 255 - WheelPos * 3);
  }
  WheelPos -= 170;
  return ring.Color(WheelPos * 3, 255 - WheelPos * 3, 0);
}
OUTPUT
This post was inspired by Getting Started with RGB NeoPixels| WS2812B
References:
- https://cdn-shop.adafruit.com/datasheets/WS2812B.pdf
- https://www.arrow.com/en/research-and-events/articles/protocol-for-the-ws2812b-programmable-led
- https://microcontrollerslab.com/mb102-breadboard-power-supply-module-pinout-and-how-to-use-it/

Follow her socials: Linkedin | Instagram | GitHub
- Explore Electronic Design Simulators with Arduino MAX7219 Heart Match Game - January 26, 2026
- Word Clock using MAX7219 LED Dot Matrix Display - November 23, 2025
- The Future of Quantum Computing: What Will We Choose to Do? - September 27, 2025