Home is where the heart belongs. Items we own, hold sentimental value and have a sense of belonging. No doubt, the state of our residence can have a profound impact on our well-being. This makes it equally essential to preach sustainability, maintain items that add value to our lives and declutter the rest.
One of the most convenient ways to keep your home clutter free is the infamous Three-box system. Go through your home room by room and sort clutter items you find into 3 bins labelled as:-
- E-waste: Electronic items that are non-operable/broken/contain toxic chemicals, need to be dropped off at a special e-waste recycling site.
- Reuse: Items that are useful in your daily life.
- Donate: Items in good condition that you no longer need can be given away.
Teachable Machine by Google’s Creative Lab helps you train your PC/Laptop to recognize customised images/poses/sounds to generate a machine learning model from the comfort of the browser. This trained model can be then downloaded and used in real-time projects/applications as per your requirements.
The Teachable Machine works on Transfer Learning (reusing a pre-trained model to solve a new problem) and has a pre-trained model that runs fast, works on the browser and recognises more than 1,000 different kinds of things. This is the sole reason why a decent amount of image/video samples is sufficient to train your model via Teachable Machine, otherwise training a classification model from scratch without this base model would require a larger data set and be even more time consuming.
Explore machine learning programming: How can a machine recognise faces ?
For witnessing virtual home decluttering with Teachable Machine, consider a few sample household items categorised into 3 bins as shown in the table:-
1. E-WASTE | 2. REUSE | 3. DONATE |
 9V Battery |  Carton Box |  Text Book |
 LED Bulb |  Paper Bag |  Stuffed Penguin |
 Wired Earphone |  Glass Jar |  Pile of Clothes |
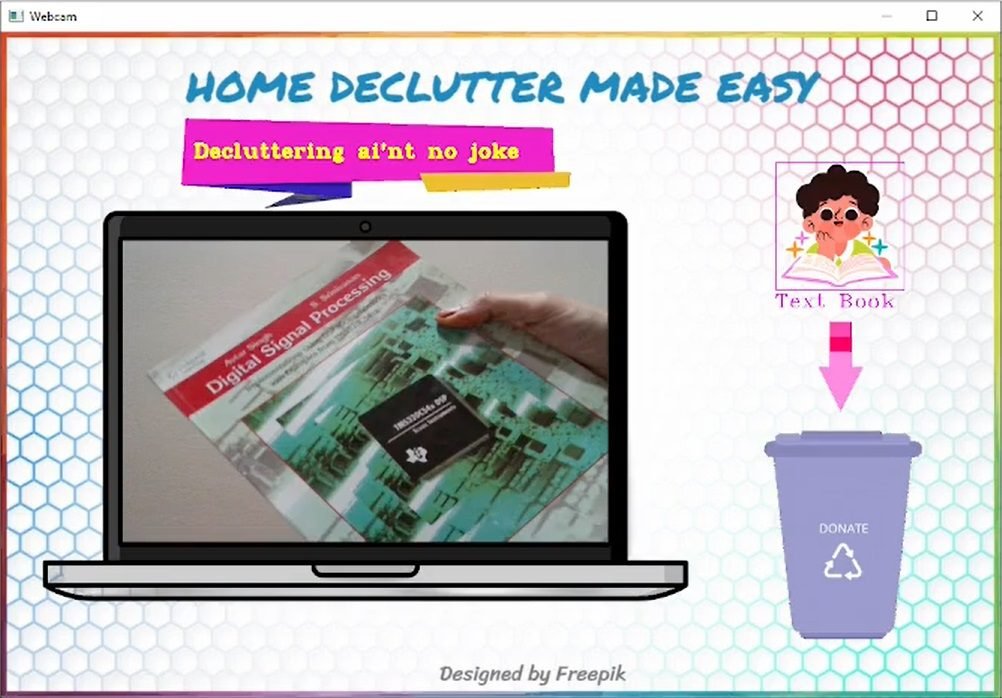
Train your image model using a Teachable Machine to recognise the above mentioned items. Load the trained model in the Home Declutter Project to virtually sort these into their specific bins when an item is shown to the Laptop/PC’s Webcam. What makes this project interesting, is whenever an item is correctly identified and matched to its bin, a funny cartoonish look alike of the item pops up on the Laptop/PC’s screen, followed by a fantastic caption!
Tips on achieving an optimal image recognition model
While training an image model via Teachable Machine, it is quite crucial to capture image samples so that your model has a good confidence score. Each prediction made by the model produces an output called a confidence score. A high confidence score indicates the likelihood that the trained model is confident that its prediction is correct. These are a few tips to keep in mind:-
- Teachable Machine currently works only on the Desktop site. Recording image samples via mobile camera might seem convenient. However, when you launch Teachable Machine on your mobile and navigate to Get Started→+New Project, an error message is displayed: “Sorry… Your browser or device doesn’t support Teachable Machine.”
- Choose a bright backdrop such as a white wall and position your Laptop/PC’s Webcam facing it. This gives you clearer image samples when you hold the item against the background and show it to your PC/Laptop’s Webcam.
- To get a good variety of image samples, make sure to move the item slightly, positioning it at different angles, and taking it closer or away from the Webcam.
- You can also show a picture of the item rather than the actual item to your Laptop/PC’s Webcam. Ideally, this could work as the item’s picture still counts as an image.
Home Decluttering with Teachable Machine
Let’s look at the step-by-step implementation of home decluttering with Teachable Machine:-
- Visit Teachable Machine →Get Started→Image Project→Standard image model.
- Rename the “Class 1” label as “Nothing”. Position your Laptop/PC’s Webcam facing a default background such as a white wall. Add image sample →Webcam→Hold to Record. 50 to 100 image samples should be sufficient. This is the default class.
- Rename the “Class 2” label as “9V battery”. Hold the “9V battery” against your default background and show it to your PC/Laptop’s Webcam. Add image samples →Webcam→Hold to Record. 100 to 200 image samples should be sufficient. Repeat this for all the remaining items one after another. A decent range of item classes is around 2 to 10.
- Click on→3-dot ellipsis on the right →Options: Delete class/Disable class/Remove all samples/Download samples/Save samples to drive. Utilise these options at your convenience to delete and re-capture/download the image samples.
- Click on →Train Model. Don’t close your browser window or switch tabs till the training is complete to avoid losing all your captured image samples (unless you have pre-downloaded them) and end up starting from scratch.
- After the training is complete,→Preview your model live on your browser. Show the item to your PC/Laptop’s Webcam against your default background and check the confidence score for each class as well as for the default class (when no item is shown to the webcam). A good confidence score looks like around 98% to 100% per class. You can redo steps 3 and 4 to improve the confidence score for a specific class/all classes. Once you are satisfied with the model, click on→Export Model→Tensorflow→☑Keras→Download my model. This initials the download of your model contained in “converted_keras.zip”.
- Launch Pycharm. Go to File→New project→”HomeDeclutterProject”.
- Go to File→Settings→Project:HomeDeclutterProject→Python Interpreter→”+”. Install all the latest versions of these dependencies one after another:-
cvzone
tensorflow
opencv-python
numpy
python-vlc
time
- If you decide to use similar items/images as mentioned in this project to train your model then you can download the Resources directory from here→Resources and add it to HomeDeclutterProject.
- Extract lables.txt and keras_model.h5 from the converted_keras.zip file to the Models sub-directory of the Resouces directory of the HomeDeclutterProject.
- Add HomeDeclutterMadeEasy.py from the programming section to HomeDeclutterProject and execute.
- Again, position your Laptop/PC’s Webcam against your default background, show your item the Webcam and visualise home decluttering with Teachable Machine!
Different dependencies that you might come across
Dependency | Purpose |
cvzone | Run image processing and AI functions with ease. |
tensorflow | Creating Deep Learning models. |
opencv | Process images/videos to detect objects, faces, or even human handscripts in real time. |
numpy | Perform a variety of mathematical operations on arrays. |
pyplot from matplotlib | Visulising 2D plots. |
Image from PIL | Editing, creating and saving images. |
python-vlc | Enable VLC media player pre-installed on PC/Laptop to play audio/video files in the Python IDE. |
random | Built-in Python module used for generating random numbers, displaying random elements from a list, shuffling elements randomly, etc. |
sleep function from time | Add time delay in program. |
Overlaying images on the desired ROIs of a Primary image
An image is a 2D object with dimensions of (width, height) in an (x, y) position, where x runs continuously from 0 to width and y from 0 to height. By obtaining the image plot in the standard image coordination system, you can easily pinpoint the location of the ROI (Region of Interest) upon which an image is to be pasted. The same method can be repeated to overlay more than one image on the desired ROI of a primary image.
As you can see from the programming section, multiple images including the camera feed have been overlayed on the background (primary) image. This is how it can be accomplished:-
- Execute the OverlayingImagesOnPrimaryImageROIs.py from the programming section. You get 2 output windows, one named ‘Background’ and the other containing the resultant output image obtained after overlaying images on the desired ROIs of a primary image.
- Go to→’Background’ window and hover over it to see the (x,y) values mentioned in the bottom right corner. Find the exact x and y coordinates of the desired ROI.

- Edit the ROI (x,y) values of images to overlay in the OverlayingImagesOnPrimaryImageROIs.py program. Execute again and check the resultant output image.

- Repeat steps 2 and 3 for more images or till you get the desired results.
(Or)
- Upload your primary image to https://pixspy.com/.
- Go to→Formatter→Add Custom Formater. Type (x,y)→Enter.
- Hover to find the exact x and y coordinates of the desired ROI.
PROGRAMMING
Program 1: HomeDeclutterMadeEasy.py
#HomeDeclutterMadeEasy.py
#Made by Wiztaqnia
#Modified date 14/01/2024
import cvzone
from cvzone.ClassificationModule import Classifier
import cv2 as cv
import os
import random
import vlc
import time
import numpy as np

def store_labels():           #store the clutter item's labels
labels = {}
with open("Resources/Model/labels.txt", "r") as label:
text = label.read()
lines = text.split("\n")
for line in lines[0:-1]:
hold = line.split(" ", 1)
labels[hold[0]] = hold[1]
return labels
def import_images(directory): #import images from 'Resources' directory
imgList = []
pathList = os.listdir(directory)
for path in pathList:
imgList.append(cv.imread(os.path.join(directory, path),cv.IMREAD_UNCHANGED))            #cv.imread((os.path.join(current folder,current image file path),retain image transparency)
return imgList
cam = cv.VideoCapture(0)
classifier = Classifier('Resources/Model/keras_model.h5', 'Resources/Model/labels.txt') #load the trained model along with the respective clutter item's labels
labels = store_labels()
arrow=cv.imread('Resources/Arrow.png',cv.IMREAD_UNCHANGED)
notification=cv.imread('Resources/Notification.png',cv.IMREAD_UNCHANGED)
clutterList=[]
clutterList=import_images("Resources/Clutter") #import all the clutter items images
binsList=[]
binsList=import_images("Resources/Bins")       #import all the bin images
captions = ['Exude Good Vibes',                #list of captions
'Decluttering ai\'nt no joke',
'Journey is the reward',
'Fantastic !',
'You\'re a Green Hero!',
'Superb !',
'Clean home = clean mind']
matchIndex={0:None,1:0,2:0,3:0,4:1,5:1,6:1,7:2,8:2,9:2} #bin 0=E-Waste;bin 1=ReUse;bin 2=Donate
bin=0
while True:
_, img = cam.read()
imgResize=cv.resize(img,(485,301)) #cv.resize(img,(w,h)) #resize the webcam feed to overlay on the bankground image
background = cv.imread('Resources/Background.png')
predection = classifier.getPrediction(img)
clutter = np.argmax(predection[0])
classID=predection[1]
if classID!=0:
background=cvzone.overlayPNG(background,clutterList[classID-1],(775,130))                                             #show the clutter item based on the prediction
background = cv.rectangle(background, (775,130), (775+128,130+128),(255,0,255), 1)                                    #draw a pink box around the clutter item image
background=cv.putText(background, labels[str(clutter)], (773, 275), cv.FONT_HERSHEY_COMPLEX_SMALL, 1, (255,0,255), 1) #display the predicted clutter item's label
background=cvzone.overlayPNG(background,arrow,(810,260))
bin=matchIndex[classID]
if bin==matchIndex[classID]:
ambience = vlc.MediaPlayer('Resources/positive_notification.mp3')
ambience.play()                                                                                        #play audio for pop-up notification
random.shuffle(captions)
text = random.choice(captions)
background = cvzone.overlayPNG(background, notification, (125, 50))
background = cv.putText(background,text, (192,125), cv.FONT_HERSHEY_COMPLEX_SMALL, 1, (0, 255, 255),2) #display random text from the list of captions
time.sleep(0.5)                                                                                        #delay of 0.5 seconds
background=cvzone.overlayPNG(background,binsList[bin],(745,360))
background [209:209+301,122:122+485]=imgResize                                                         #background[x:x+w,y:y+h]=imgResized
cv.imshow('Webcam',background)
cv.waitKey(1)
Program 2: OverlayingImagesOnPrimaryImageROIs.py
#OverlayingImagesOnPrimaryImageROIs.py
#Made by Wiztaqnia
#Modified date 14/01/2024
import cv2 as cv
from matplotlib import pyplot
from PIL import Image
background=cv.imread('Resources/Background.png')
imgRGB=cv.cvtColor(background,cv.COLOR_BGR2RGB) #convert the image from RGB to BGR (default color space for openCV is BGR)
pyplot.figure('Background')
pyplot.imshow(imgRGB)            #show the 'Background' window
imgPrimary = Image.open('Resources/Background.png')
clutter=Image.open('Resources/Clutter/1.png')
arrow=Image.open('Resources/Arrow.png')
bin=Image.open('Resources/Bins/1.png')
imgPrimary.paste(clutter, (775,130), mask=clutter)
imgPrimary.paste(arrow,(810,260), mask=arrow)
imgPrimary.paste(bin, (745,360), mask=bin)
imgPrimary.show()                #show the Resultant Overlay Image
OUTPUT
This post was inspired by Recyclable Waste Classifier using Opencv Python | Computer Vision
References:
- https://www.youtube.com/watch?v=kwcillcWOg0
- https://www.budgetdumpster.com/resources/how-to-declutter-your-home.php
- https://www.geeksforgeeks.org/overlay-an-image-on-another-image-in-python/
- https://support.wolfram.com/25330
For exclusive insights, tips and answers, please visit Wiztaqnia Forum.

Follow her socials: Linkedin | Quora | Instagram
- Can you inherit your data forever? - January 22, 2025
- The Future of Quantum Computing: What Will We Choose to Do? - January 15, 2025
- IoT based Indoor Air Quality ENS160 Monitor - November 20, 2024