Are you having trouble programming Raspberry Pi Pico/Pico W on Windows OS? It seems like your PC/Laptop is missing a driver. Your PC/Laptop requires a Board CDC driver to communicate with Raspberry Pi Pico/Pico W. In general, there is no need to worry about installing drivers for new devices on Windows, as the system automatically takes care of it. However, it is important to note that Microsoft Corporation (the developer of Windows OS) has discontinued support for Windows OS <10 since January 2023.
Suppose you are facing problems while programming Raspberry Pi Pico/Pico W on your Windows OS it is worth considering the version of Windows OS you are using. The fact that Windows OS versions older than Windows 10 are considered obsolete by the official standards may be the cause of this issue.
That’s no biggie! Let’s get a few basics cleared around programming Raspberry Pi Pico/Pico W with Windows OS and fix this problem:-
- Raspberry Pi Pico/Pico W is essentially a microcontroller. To interface with the Raspberry Pi Pico/Pico W, you need a serial port.
- PCs/Laptops connect to external hardware devices using USB ports, not serial ports.
- Board CDC driver is a software that can be used to establish communication with the Raspberry Pi Pico/Pico W via USB.
- The Board CDC driver mimics the computer’s USB port as a virtual serial port (COM port) and allows the PC/Laptop to communicate with the Raspberry Pi Pico/Pico W.
- Once this driver is installed, you can communicate with the Raspberry Pi Pico/Pico W on your PC/Laptop via a USB cable.
Explore Raspberry Pi Pico/Pico W related DIY E-Projects: Testing Scoppy Pico Smart Oscilloscope with 5 electronic circuits
PROCEDURE
If you are using Windows OS<10 and the Raspberry Pi Pico/Pico W model is not being detected on Thonny IDE, then follow these steps:-
- Download the MicroPython firmware .uf2 file according to the Raspberry Pi Pico/Pico W model from www.raspberrypi.com/documentations/micropython/:-
- Press and hold the “BOOTSEL” button on Raspberry Pi Pico/Pico W while simultaneously connecting it to your Laptop/PC via data cable. This will enable Raspberry Pi Pico/Pico W to enter Bootloader mode and appear as a mass storage device.
- Release BOOTSEL once the external drive RPI-RP2 appears on your Laptop/PC. Paste the .uf2 firmware (downloaded from step 1) to the external drive RPI-RP2 of Raspberry Pi Pico/Pico W.
- Keep the Raspberry Pi Pico/Pico W connected to your Laptop/PC, right click on My Computer→Manage→Device Manager→Other devices. Observe that the Board CDC driver has a yellow exclamatory mark in the “Other Devices” category of your Device Manager on the Laptop/PC. This means that the Board CDC driver is missing.

- To fix this, download and install the latest version of Zadig from https://zadig.akeo.ie/.
- Keep the Raspberry Pi Pico/Pico W connected to your Laptop/PC and launch Zadig. Select Board CDC (Interface 0) from the dropdown. Select the driver as a USB Serial (CDC). Click on Install Driver.

- Go to Laptop/PC, right click on My Computer→Manage→Device Manager→Ports(COM & LPT). Observe that the correct driver is installed and appears as Board CDC (Interface 0) COM 5 in the Ports (COM & LPT) category of your Device Manager on the Laptop/PC. (Note: the COM port number may be different depending on your Laptop/PC.)

- Visit https://thonny.org/ and download and install the latest version of Thonny IDE, depending on your Windows OS architecture, i.e. x64 or x86.
- Launch the Thonny IDE by keeping the Raspberry Pi Pico/Pico W connected to your Laptop/PC. When you press the Run button, you might encounter an error message in the Shell window:-
Unable to connect to COM5: port not found

Process ended with exit code 1.
- To fix the above error, go to Thonny IDE→Tools→Options→Interpreter→Select Micro Python (Raspberry Pi Pico) →Select Board CDC @COM5 from the Port or WebREPL dropdown→click on OK.

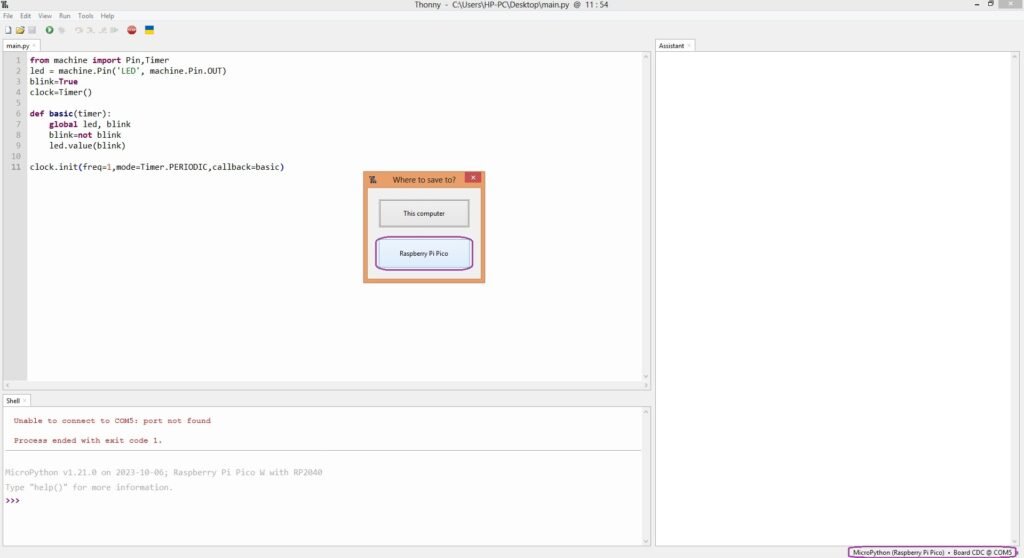
- Now it’s time to check whether you can successfully upload and execute your program on Raspberry Pi Pico/Pico W. Paste the main.py code from the programming section into the Thonny Editor prompt. Navigate to File→Save As →main.py→Where to save to?→Raspberry Pi Pico→Click on Stop→Click on Run. Observe that the popup window “Where to save to?” will only appear if Raspberry Pi Pico/PicoW is successfully detected on Thonny IDE. Also, in the bottom right corner of your screen, the COM port details will appear, which you selected in the previous step.
PROGRAMMING
Script 1: main.py
#main
#Made by www.wiztaqnia.com
#Modified date 17/05/2024
from machine import Pin,Timer
led = machine.Pin('LED', machine.Pin.OUT)
blink=True
clock=Timer()

def basic(timer):
    global led, blink
    blink=not blink
    led.value(blink)

clock.init(freq=1,mode=Timer.PERIODIC,callback=basic)
References:
- https://github.com/raspberrypi/pico-feedback/issues/118
- https://www.quora.com/Why-did-Microsoft-no-longer-support-Windows-7-and-8-as-operating-systems-in-2023
- https://www.youtube.com/watch?v=zlKJ5hvfs6s

Follow her socials: Linkedin | Instagram | GitHub
- Explore Electronic Design Simulators with Arduino MAX7219 Heart Match Game - January 26, 2026
- Word Clock using MAX7219 LED Dot Matrix Display - November 23, 2025
- The Future of Quantum Computing: What Will We Choose to Do? - September 27, 2025